Mastodon’s “Lists” feature lets you create themed mini-timelines that show posts from selected accounts you already follow. You can also optionally hide List accounts’ posts from your main Home timeline and just browse them on your Lists.
Why would I want to make Lists on Mastodon?
Lists let you do two things:
- Follow accounts on a separate mini-timeline while hiding them from your main Home timeline
- Organise your follows into themed mini-timelines so you can dip into particular topics rather than viewing everything at once
Many people use Lists for both these purposes simultaneously, for example putting news accounts onto a news-themed List and then hiding this List from the Home timeline. Because some news accounts tend to post extremely frequently, putting them in a news-themed List prevents the news accounts from overwhelming the person’s main Home timeline.
You can find out how to hide a List’s accounts from the Home timeline in the instructions below labelled “Can I view posts on Lists without them appearing on my Home timeline?”.
How many accounts can I put on one List?
As many as you want.
How do I actually make a List on Mastodon?
You can create and use Lists on your server’s website or web app and on some third party Mastodon apps such as Tusky for Android or Mona ⧉ for iPhone/iPad.
To create a list through the web version of Mastodon:
- Log in through your server’s website or web app
- Click on “Lists” on the right of the screen (if you’re on a phone click ☰ first to see the main menu)
- Click the + icon in the top right corner
- Type the name of your new List
- Select which kind of replies you want to see on your List. The options mean either no replies, just replies to other List members, or replies to anyone you follow.
- If you want to hide the List’s accounts from your Home timeline, toggle the switch for Hide Members In Home. This toggle is activated when the circle is on the right and the toggle turns blue.
- Click the Create button
- Immediately after you’ve created a List, it will show you a search box at the top of the screen where you can search for accounts to add to that List. Search for the account you want to add to that List and click “Add” next to it. If you’re not already following the account, it will follow the account too.
- Click the Done button at the bottom of the screen
How do I add accounts to my existing Lists?
If you’ve already created a List and want to add more accounts to it, your Mastodon app may support adding accounts to Lists. Not all of them do however, so if you can’t see such an option try using the website method below.
Here’s how to add accounts to an existing List through your server’s website or web app:
- If you haven’t already, log into your your server’s website or web app
- Click on Lists (if you’re on a phone click ☰ first to see the main menu)
- Click on the List you want to add accounts to
- Click on the arrows icon in the top right corner of the List
- Click Edit List
- Click Manage List Members
- In the search box, search for an account you would like to add to the List. When you see the correct account in the results, click the Add button next to it. (If you’re not following the account already, clicking Add will also follow the account.)
- Click the Done button at the bottom of the screen
Apps may have slightly different interfaces for editing Lists, but it’s the same feature and handles the same Lists. Your Lists will sync across devices no matter what app or interface you use to manage them.
How do I remove accounts from Lists?
Do the same steps as above in “How do I add accounts to my existing Lists?”, but don’t do any searching. Instead, click on the Remove button next to the account you want to remove from the List.
Can I view posts on Lists without them appearing on my Home timeline?
Yes, this is one of the main purposes of Lists! You can hide posts on a particular List from appearing on your Home timeline, here is how to do it:
- If you haven’t already, log into your your server’s website or web app
- Click on Lists (if you’re on a phone click ☰ first to see the main menu)
- Click on the List you want to hide from Home
- Click on the arrows icon in the top right corner of the List
- Click Edit List
- Click the Hide Members In Home toggle switch so that it turns blue and the white circle moves to the right
- Click the Save button at the bottom of the screen
After you’ve done this, posts from the accounts on that List will no longer appear on your Home timeline but will appear on that List’s timeline.
My List looks empty! Is it working?
Don’t worry if a List looks empty. Lists always start out empty as they don’t show posts from before the List was created. Once the accounts on the List start publishing newer posts, you will start seeing these new posts appear on the List.
Am I still following accounts if I hide them from my Home timeline?
Yes, you are still following them. You’re viewing them via a List rather than your main timeline, but it’s still a follow.
How do I view my existing Lists?
If you’re using your server’s website or web app, you can view your Lists by clicking Lists on the right of the screen (if you’re on a phone click ☰ first to see the main menu).
If you’re using the official Mastodon apps, go to your main timeline (the one that appears when you first open the app) and click on the Following link at the top left, then select Lists and then the List you want to view.
If you’re using third party apps, they will have various interfaces for viewing Lists.
How do I edit or delete an existing List?
To edit or delete an existing List, click on the List’s name to open it and then click on the arrows icon in the top right corner of the List.
How do I change the name of an existing List?
- If you haven’t already, log into your your server’s website or web app
- Click on Lists (if you’re on a phone click ☰ first to see the main menu)
- Click on the List you want to hide from Home
- Click on the arrows icon in the top right corner of the List
- Click Edit List
- Type the new name of the List into the List Name box
- Click the Save button at the bottom of the screen
Do the official Mastodon apps support Lists?
The official apps sort of support Lists, but their support isn’t as good as the website, web app or selected third party apps.
The official Android Mastodon app lets you view Lists and add accounts to Lists, but doesn’t let you create Lists. To add a profile to a List on the Android app, click ︙in the top right corner and then Add to list…
The official iPhone/iPad Mastodon app lets you view lists but not create them or add to them.
Third party apps such as Tusky for Android and Mona ⧉ for iPhone/iPad tend to have better support for Lists than the official apps.
Why do I have to follow accounts that I add to Lists?
The following requirement is for the sake of safety and privacy. On some social networks such as Twitter, List-style features have been misused by trolls and bullies to make lists of potential victims.
On Mastodon, the follow requirement gives people more control over being listed. If an account has follow requests activated, it lets them control whose Lists they may end up on, and if an account blocks someone that also prevents them being added to that person’s Lists.
Do boosts show up on Lists?
Yes, you see everything you would see from that account on your Home timeline.
Can I follow hashtags on Lists?
No, not at the moment. However, this is a very popular suggestion and if you’re comfortable using Github you can vote for this option by giving a thumbs up on the relevant issue ⧉.
How many Lists can I create?
Up to 50 lists.
Can I share Lists with other people?
No, they’re just for your personal use. Think of them like personal mini-timelines.
What do all the options mean on the Lists feature?
Edit list – Lets you change the List’s name, change whether it appears in the Home timeline lets you add or remove accounts from the List
Delete list – Deletes the List
List Name – Lets you change the name of that List
Include replies from list members to no one – You will only see posts from members of the List, you will not see any of their replies to anyone.
Include replies from list members to members of the List – As well as posts, you will also see replies from List members to other members of that same List.
Include replies from list members to any followed user – As well as posts, you will also see replies from List members to anyone else you are following, even if they’re not on a List.
Manage List members – Takes you to a screen where you can see all the current members of that List and search for more accounts to add to that List
Hide members in Home – With this option switched on, posts that appear on your lists will not appear in your Home timeline
If I move my account to another server, can my Lists come with me?
Yes. Lists are now available to export and import as part of the account transfer process.
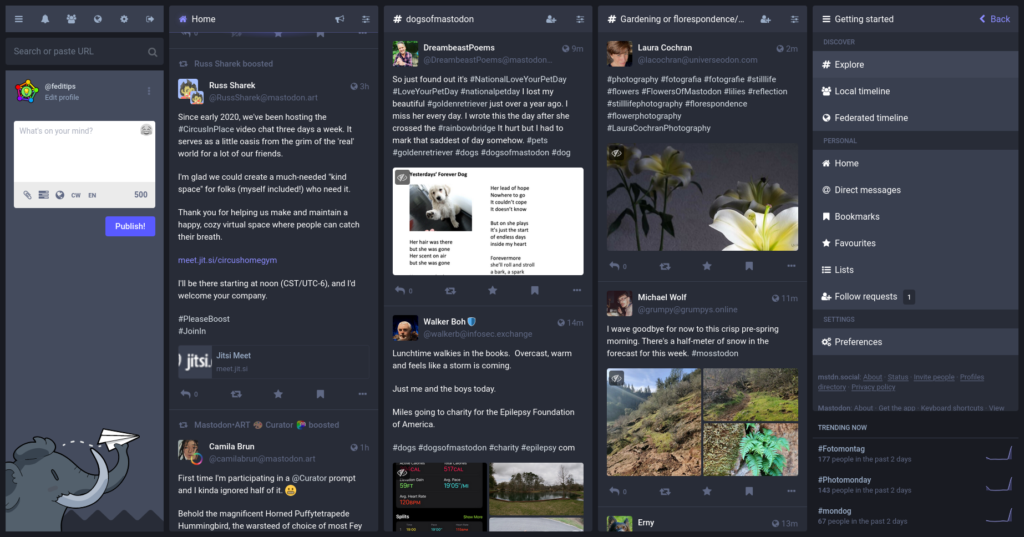
Can I view several Lists at once? Can I pin Lists in the multicolumn mode?
Yes, you can use Mastodon’s advanced web interface to view Lists and then pin them so that you see several Lists alongside each other. To pin a List:
- Log into the website with the advanced web interface switched on
- Go to the List you want to pin
- Click on the ⚙️ icon in the top right corner
- Click on “+ Pin” to pin the List (if you change your mind, click on “x Unpin” to unpin it)
↩ Back to the front page